Swingyde
Swingyde
Couldn't load pickup availability
The Swingyde golf training aid is designed to create the correct golf swing positions. The Swingyde is simple and effective, and is used by the best players and teachers in the world.
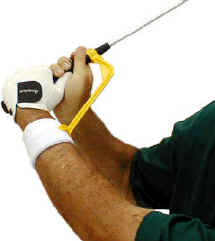
Firstly remove the the wing nut and bolt from your Swingyde, then slip the clamp over the bottom of the shaft (Figure 1) and slide the Swingyde onto the base of the grip. Before your fasten the clamp, take your left hand grip (right handed player) as shown in (Figure 2) and form a 90 deg angle between your left arm and the club. Slide the Swingyde up the grip so the cradle meets the side of your left forearm. Align Swingyde directly on top of the grip ensuring the clubface is square. (Figure 3). Now you have your Swingyde set up, replace the bolt.


Firstly remove the the wing nut and bolt from your Swingyde, then slip the clamp over the bottom of the shaft (Figure 1) and slide the Swingyde onto the base of the grip. Before your fasten the clamp, take your left hand grip (right handed player) as shown in (Figure 2) and form a 90 deg angle between your left arm and the club. Slide the Swingyde up the grip so the cradle meets the side of your left forearm. Align Swingyde directly on top of the grip ensuring the clubface is square. (Figure 3). Now you have your Swingyde set up, replace the bolt, see (Figure 4) . Firstly remove the the wing nut and bolt from your Swingyde, then slip

The Putting Drill designed to reduce wrist action and improve stroke.
1. Attach Swingyde to the bottom of your putter grip on the right hand side. (for right handed golfer) (See Figure 1).
2. Attached rubber band half way down Swingyde, be sure to double the rubber band to create tension. (See Figure 2).
3. Take left hand grip as usual, then place forefinger of right hand between rubber band and then grip the putter, feeling the pressure of the Swingyde’s cradle on the back of your right wrist. (See Figure 3).
4. Make some practice strokes maintaining pressure on the back of your right wrist. This will encourage a pure sroke.

This is great for beginner golfers, to give them the general feel of the hinging action of the golf swing. Be sure to wear the supplied wrist band for comfort.
Attach your Swingyde to a mid iron (6-8 iron) as instructed. Holding the club vertically in your left hand, hook the rubber band over the right side of the cradle. (See Figure 1) Then pull the rubber band over to the left and under the fore arm, and back up and attach to the left side of the Swingyde. (See Figure 2). Now you are ready to practice. (See Figure 3).
Now you are ready for the rubber band drill.
Take address position. Swing back until left arm is parallel to ground, and allow rubber band to pull Swingyde into the fore arm creating 90 degree hinge. (9 o’clock position)

Reduces Incorrect wrist cocking and encourages correct radial deviation of the wrist
Achieve greater distance and better accuracy - reduce your handicap
Lightweight and easy to attach
Corrects club face alignment
Improves grip and width and swing arc
Corrects swing plane
Checks completion of backswing
Improves swing tempo
Corrects start of downswing
Improves impact position
Improves follow through and plane